操作指南
拉取代码仓库地址
https://gitlab.atjuboyun.com/cpyf/components/jb-design-ui
打包上传方式
1. 进入JB-design项目根目录下执行以下命令
npm run build2. 进入JB-design/build项目根目录下打开package.json文件,植入scripts内容的npm publish代码
{
    "name": "JB-design", // 组件库的名称
    "version": "1.0.7",  // 版本
    "description": "JB组件库",  // 组件库的介绍
    "main": "./lib/index.js",
    "module": "./es/index.js",
    "unpkg": "./dist/index.js",
    "typings": "./es/index.d.ts",
    "types": "./es/index.d.ts",
    "style": "dist/index.css",
    "scripts": {
        "test": "echo \"Error: no test specified\" && exit 1",
        "JB-design:dev": "npm publish --registry https://nexus.atjuboyun.com/repository/npm-hosted-dev/",  // 开发环境
        "JB-design:test": "npm publish --registry https://nexus.atjuboyun.com/repository/npm-hosted-test/",  // 测试环境
        "JB-design:prod": "npm publish --registry https://nexus.atjuboyun.com/repository/npm-hosted/",  // 生产环境
        "JB-design:pre": "npm publish --registry https://nexus.atjuboyun.com/repository/npm-hosted-pre/" // 预发布环境
    },
    "homepage": "https://wuyonggithub.github.io/", // 项目的仓库地址
    "sideEffects": [
        "dist/*",
        "*.css",
        "*.md"
    ],
    "keywords": [
        "fit",
        "适配",
        "组件库",
        "scale",
        "ScaleBox",
        "vue3"
    ],
    "vetur": {
        "tags": "tags.json",
        "attributes": "attributes.json"
    },
    "author": "wyk",  // 作者
    "license": "ISC"
}
3. 进入JB-design/build项目根目录下执行以下命令即可完成打包上传私服仓库
npm run JB-design:dev // 将包上传到开发环境
or
npm run JB-design:dev // 将包上传到开发环境
or
npm run JB-design:dev // 将包上传到开发环境
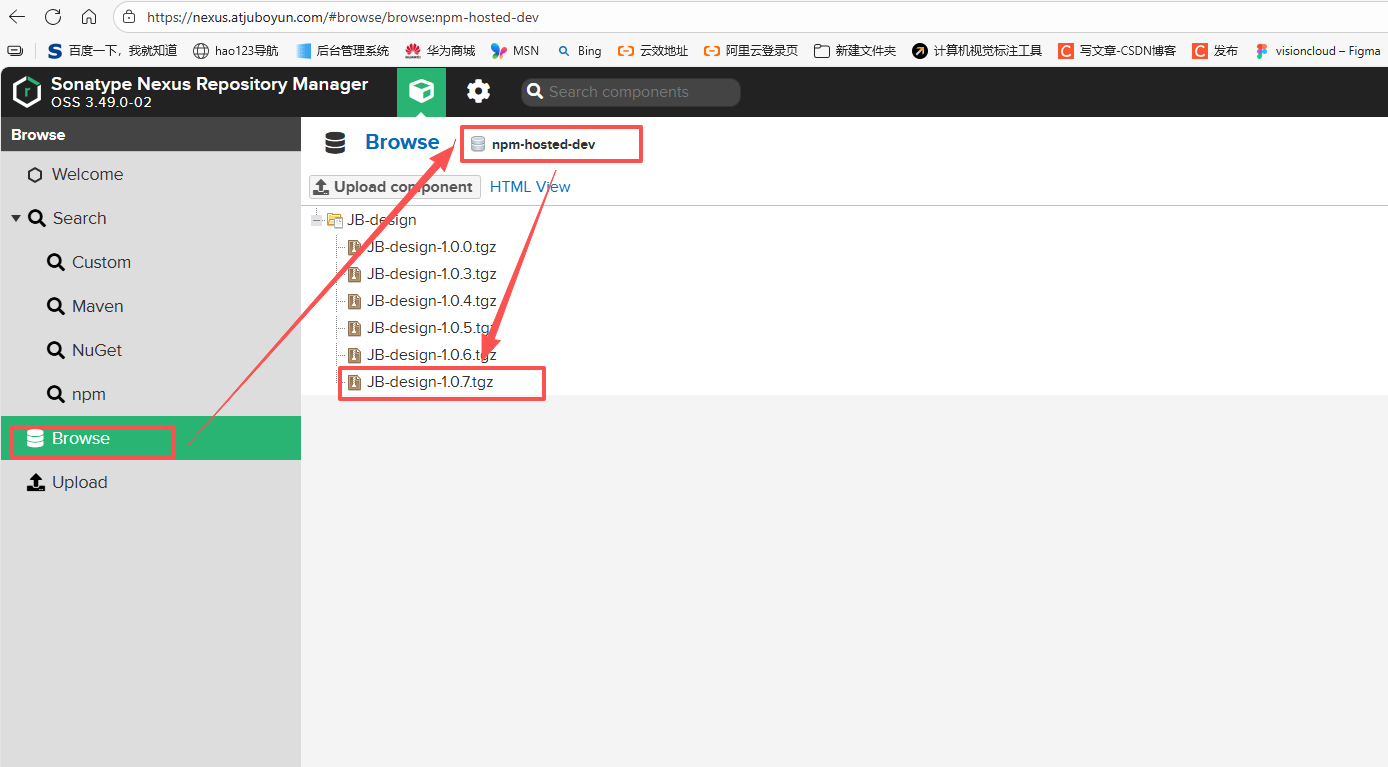
4. 查看是否上传成功,记住更新一版本就要在版本后面++1

包管理器安装使用
我们建议您使用包管理器(如 NPM、Yarn 或 pnpm)安装 JB-design
# 选择一个你喜欢的包管理器
# NPM
$ npm install JB-design@x.x.x --registry https://nexus.atjuboyun.com/repository/npm-hosted-dev/

# Yarn
$ yarn add JB-design --registry https://nexus.atjuboyun.com/repository/npm-hosted-dev/

# pnpm
$ pnpm install JB-design --registry https://nexus.atjuboyun.com/repository/npm-hosted-dev/
完整引入
如果对打包后的文件大小不是很在乎,那么使用完整导入会更方便,但你需要提前下载好相关组件的依赖。
// main.ts
import { createApp } from "vue";
import JbDesign from "JB-design";
import "JB-design/dist/index.css";
import App from "./App.vue";

const app = createApp(App);

app.use(JbDesign);
app.mount("#app");
按需引入
1、您需要使用额外的插件来导入要使用的组件。
首先你需要安装unplugin-vue-components
pnpm add unplugin-vue-components -D2、复制该解析器
const JbDesignResolver = () => {
    return {
        type: "component" as const,
        resolve: (name) => {
            if (name.startsWith("Bq")) {
                const pathName = name.slice(2).toLowerCase();
                return {
                    importName: name,
                    from: "JB-design",
                    path: `JB-design/es/components/${pathName}/index.js`,
                    sideEffects: `JB-design/es/components/${pathName}/${name.slice(2)}.css`,
                };
            }
        },
    };
};3、在unplugin-vue-components引用该解析器
// vite.config.ts
import Components from "unplugin-vue-components/vite";
import { JbDesignResolver } from "xxxx-你存储JbDesignResolver的文件";

export default defineConfig({
    // ...
    plugins: [
        Components({
            //...
            resolvers: [JbDesignResolver()],
        }),
    ],
});
手动导入
JB-design 提供了基于 ES Module 的开箱即用的Tree Shaking 功能。
但你需要加载该插件vite-plugin-import,解决本地开发时的动态加载、代码如下:
export default function importPlugin() {
    const regStr = /(?<!\/\/.*|\/\*[\s\S]*?\*\/\s*)import\s*{\s*([^{}]+)\s*}\s*from\s*['"]JB-design['"]/g;
    return {
        name: "vite-plugin-import",
        enforce: "pre",
        transform: (code: string, id: string) => {
            if (id.endsWith(".vue")) {
                const str = code.replaceAll(regStr, (match, imports) => {
                    const list = imports.split(",");
                    const pathList: string[] = [];
                    list.forEach((item: string) => {
                        item = item.trim();
                        const name = item.slice(2).charAt(0).toLowerCase() + item.slice(3);
                        const str = `import ${item.trim()} from 'JB-design/es/components/${name.trim()}';
                        import 'JB-design/es/components/${name.trim()}/${item.trim().slice(2)}.css'`;
                        pathList.push(str);
                    });
                    return pathList.join(";");
                });
                return str;
            }
            return code;
        },
    };
}
WARNING
exclude中必须排除JB-design、因为 JB-design 存在第三方包,vite预加载会报错、当然如果已安装了JB-design所有组件需要的包、则不需要做该处理
// vite.config.ts
import Components from "unplugin-vue-components/vite";
import ViteImportPlugin from "./src/utils/vite-plugin-import";

export default defineConfig({
    optimizeDeps:{
        exclude: ["JB-design"],
    },
  // ...
  plugins: [
     ViteImportPlugin(),
  ],
})
前端组件库版本控制与私有仓库发布规范
项目名称: JB-DESIGN-UI
维护团队: 前端架构组
最后更新: 2025年10月20日
适用范围: 所有基于 npm + Nexus 的前端组件库项目
目标
- 统一组件库版本管理流程
- 规范发布到私有 NPM 仓库(Nexus)的操作
- 支持多环境(开发、测试、预发、生产)发布
- 保障版本稳定性与可追溯性
- 防止错误发布或覆盖线上版本
私有 NPM 仓库地址
| 环境 | Registry 地址 |
|---|---|
| 开发环境(dev) | https://nexus.atjuboyun.com/repository/npm-hosted-dev/ |
| 测试环境(test) | https://nexus.atjuboyun.com/repository/npm-hosted-test/ |
| 预发布环境(pre) | https://nexus.atjuboyun.com/repository/npm-hosted-pre/ |
| 生产环境(prod) | https://nexus.atjuboyun.com/repository/npm-hosted/ |
登录认证
所有发布操作需提前配置
.npmrc并登录:bashnpm login --registry=https://nexus.atjuboyun.com/repository/npm-hosted/
版本号规范(Semantic Versioning)
采用 SemVer 2.0.0 语义化版本规范:
MAJOR.MINOR.PATCH
| 版本位 | 变更说明 | 示例 |
|---|---|---|
MAJOR | 不兼容的 API 修改 | 1.0.0 → 2.0.0 |
MINOR | 新功能(向下兼容) | 1.2.0 → 1.3.0 |
PATCH | 修复 bug(向下兼容) | 1.2.3 → 1.2.4 |
禁止手动修改
package.json中的version字段!
请使用npm version命令自动更新并生成 Git Tag。
发布脚本配置(package.json)
{
    "name": "JB-design",
    "version": "1.0.7",
    "description": "JB组件库",
    "main": "./lib/index.js",
    "module": "./es/index.js",
    "unpkg": "./dist/index.js",
    "typings": "./es/index.d.ts",
    "types": "./es/index.d.ts",
    "style": "dist/index.css",
    "scripts": {
        "test": "echo \"Error: no test specified\" && exit 1",
        "JB-design:dev": "npm publish --registry https://nexus.atjuboyun.com/repository/npm-hosted-dev/",
        "JB-design:test": "npm publish --registry https://nexus.atjuboyun.com/repository/npm-hosted-test/",
        "JB-design:pre": "npm publish --registry https://nexus.atjuboyun.com/repository/npm-hosted-pre/",
        "JB-design:prod": "npm publish --registry https://nexus.atjuboyun.com/repository/npm-hosted/"
    },
    "homepage": "https://wuyonggithub.github.io/",
    "sideEffects": ["dist/*", "*.css", "*.md"],
    "keywords": ["fit", "适配", "组件库", "scale", "ScaleBox", "vue3"],
    "vetur": {
        "tags": "tags.json",
        "attributes": "attributes.json"
    },
    "author": "wyk",
    "license": "ISC"
}
发布流程(标准操作)
1. 开发阶段(本地)
git checkout dev
git pull origin dev

# 开发完成后
git add .
git commit -m "feat: 新增 Button loading 状态"
git push origin dev
2. 发布开发版(供本地调试)
npm run JB-design:dev供本地项目通过以下方式安装测试:
npm install JB-design@latest --registry https://nexus.atjuboyun.com/repository/npm-hosted-dev/3. 发布测试版(测试环境)
git checkout test
git merge dev
git push origin test
npm run JB-design:test
通知测试团队使用:
npm install JB-design@latest --registry https://nexus.atjuboyun.com/repository/npm-hosted-test/4. 发布预发布版(Pre-release)
创建预发布版本(如 1.2.3-rc.1)
npm version 1.2.3-rc.1 -m "chore: pre-release version %s"
# 发布到 pre 仓库
npm publish --registry https://nexus.atjuboyun.com/repository/npm-hosted-pre/
用于灰度发布或内部体验,不推荐线上使用。
5. 发布正式版(Production)
git checkout main
git merge test
git push origin main

npm run version:patch # 或 minor / major
npm run JB-design:prod
⚠️ 生产发布必须由负责人操作,且需双人复核。
关于Webpack构建的项目
支持完整引入和按需导入,但手动导入需要自行配置babel-plugin-import 详情见文档